Animoog How to Download Expansion Again
Moog's latest app is deep, combining wavetable and vector synthesis in a 3D environment. We show y'all how to synthesize a shifting and evolving pad sound.
Moog'south latest foray into software, Animoog Z, is a sequel of sorts to Animoog, the company's groundbreaking iOS app. The original melded wavetable and vector synthesis together, providing a two-dimensional airplane on which wavetables were laid end to stop, with the playhead hovering above it.
As the name suggests, Animoog Z takes this into the third dimension, calculation a Z-axis to the X and Y airplane. This makes it ideal for complex and evolving sounds. It likewise adds another dimension of complexity. Don't worry though – once you can properly visualize how the playhead moves through the wavetable surroundings, information technology'due south really just like any other synthesizer.
In this tutorial, nosotros'll walk you through programming an evolving pad.
Hither's our pad in the context of a chill-out track:
North.B: We recommend following forth with headphones or studio monitors. As ever, click any paradigm to come across a larger version.
A Quick Overview Of Moog Animoog Z
Animoog Z is pretty deep so we don't have time to go into every part hither but a quick overview will exist helpful before nosotros dive in. Animoog Z is an iOS, macOS and AUv3 app. It tin run on mod iPhones, iPads and in Mac OS and DAWs that support the AUv3 standard like Logic Pro Ten. (For non-supporting DAWs, y'all can download an AU/VST wrapper from Moog.)
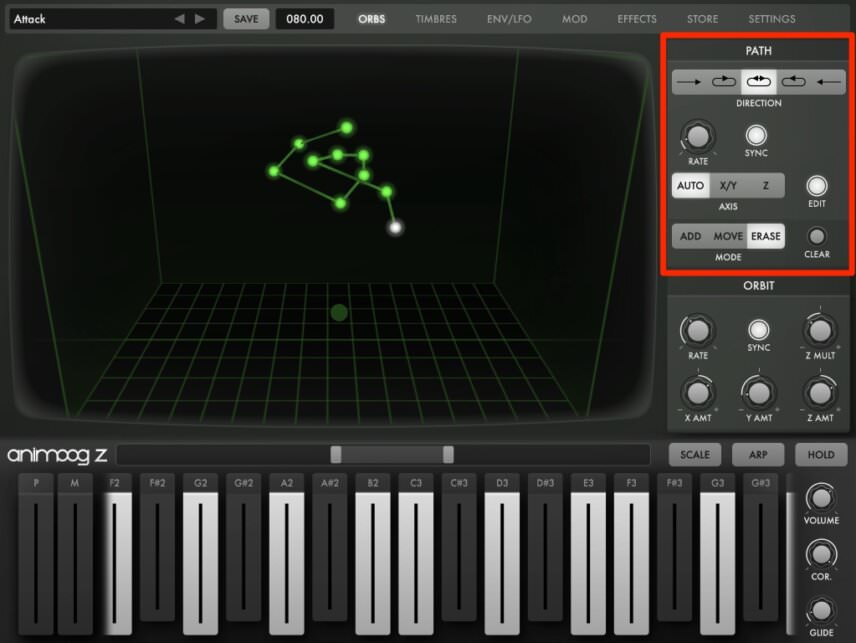
The app is divided into vii master screens, with five for programming and 2 dedicated to the shop and settings (which we'll skip). The start screen is the Orbs View, and this is where you create your path through the three-dimensional wavetable surroundings.
Inside the CRT-style Goggle box screen viewer is a Tron-like filigree of squares called the Wave Cube. The 10-axis of sixteen columns represents the 16 waveforms inside each Timbre or wavetable. The eight Timbres are laid out on the Y-axis, with Timbre 8 the closest to the screen and Timbre i the farthest. The Z-axis (which is not visible as a filigree) is a repeat of the same eight Timbres hinged at the far point of the X/Y Filigree. Run across the prototype below for a visual representation of this.
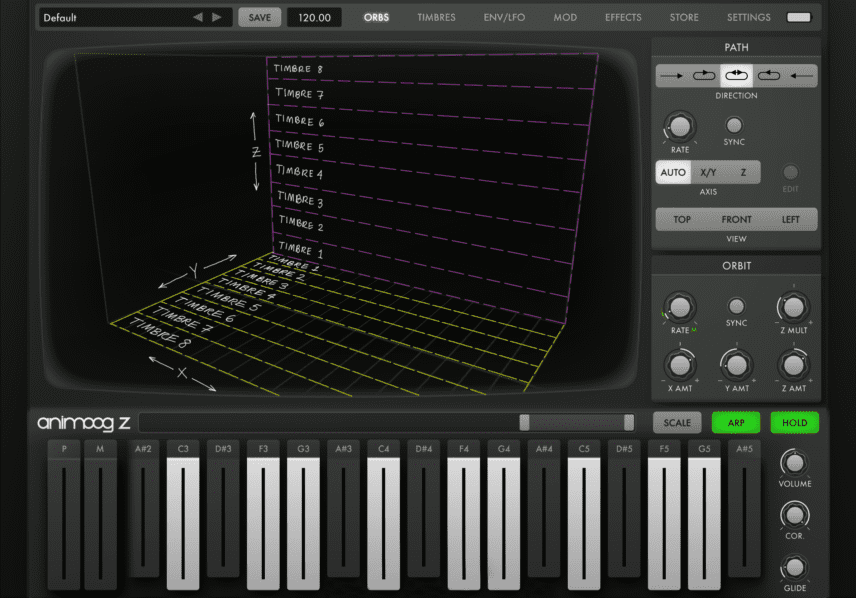
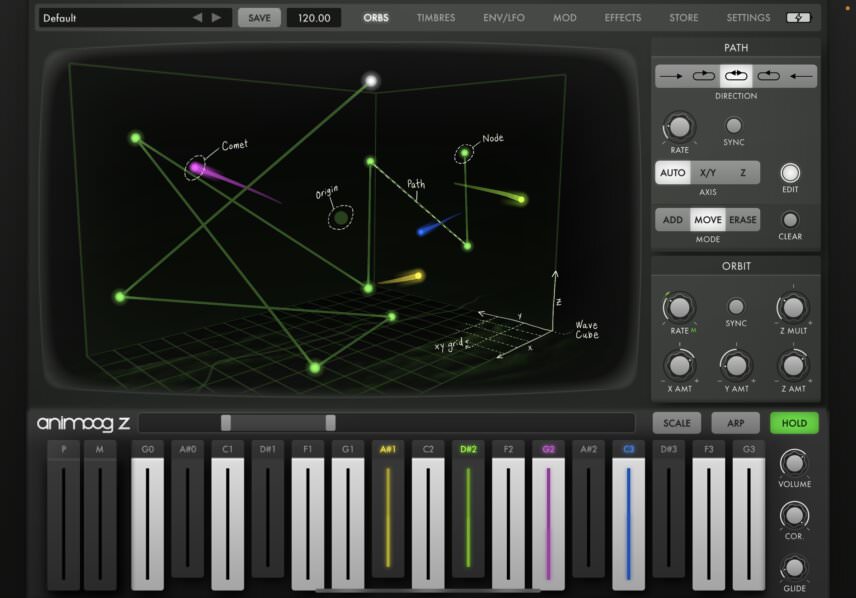
Each Orb, or Comet, moves through the Wave Cube on a predetermined path. It tin too orbit around this path. These 2 parameters are controlled via the Path and Orbit modules. Every bit the Comet moves along its path, it crossfades between four adjacent Timbres, giving us the vector synthesis part of the synthesis equation.
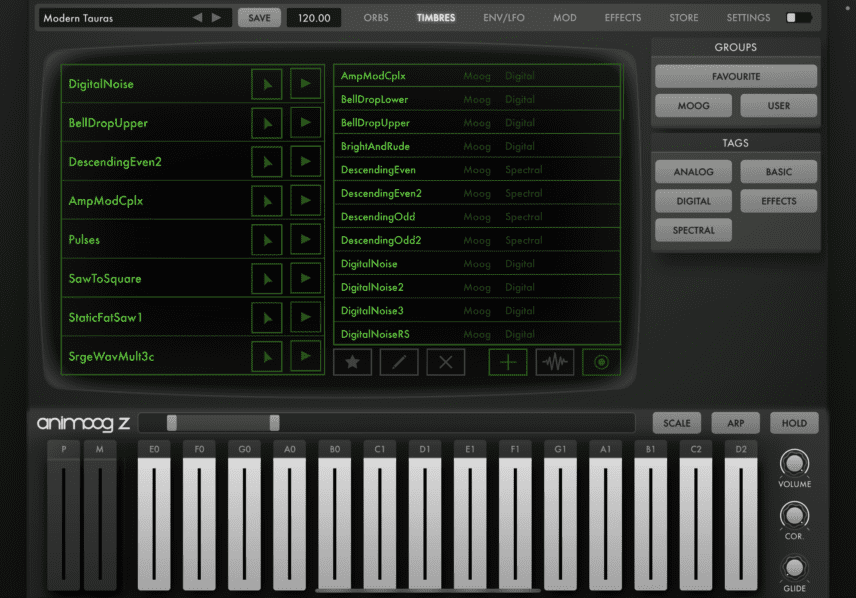
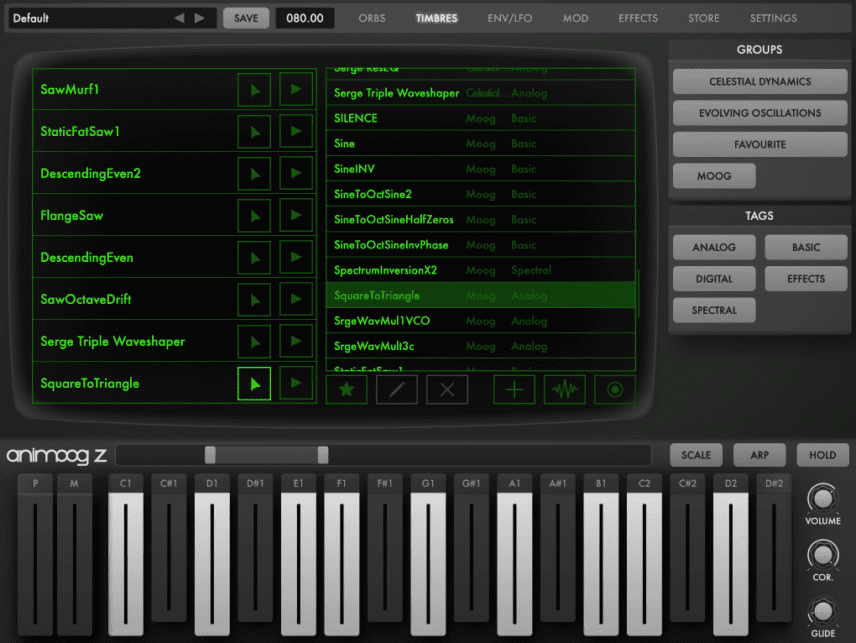
You can choose the Timbre wavetables on the Timbre folio. On the left is the organisation of Timbres in use. Bachelor Timbres are listed on the right. Clicking on the right arrow allows yous to hear a Timbre while hitting the up arrow push button, then selecting a waveform on the correct volition alter information technology. Yous can move Timbres up and downwardly to change their position in the grid.
Additional screens include the Env/LFO View, the Modernistic View for assigning modulations, and the Effects View.
It'due south OK if yous don't have this all downwardly yet. It volition brand more sense equally yous move through the steps.
Step 1: Default Patch
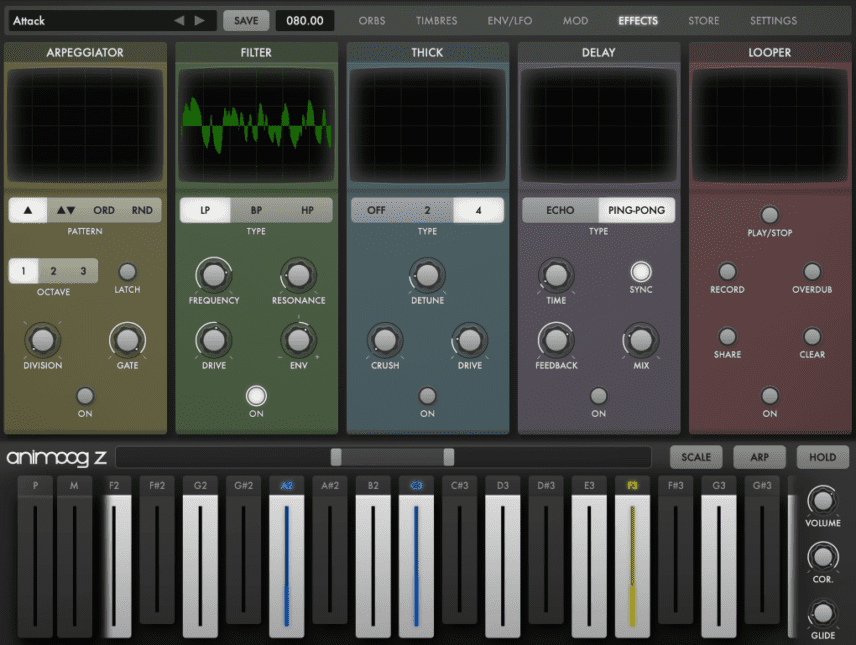
We beginning by opening an instance of Animoog Z on a new MIDI channel in an 80 bpm project and playing in a chord progression. Nosotros then choose the Default patch and turn off all effects and modulations. Lastly, nosotros set the calibration to chromatic.
Hither it is as of now. Note that all Timbres are the same so in that location's no variation in the audio:
Step 2: Timbres
The Timbres are however so let's showtime by changing some of these. We go to the Timbres View and choose a variety of interesting-sounding ones. Additional Timbre wavetables are available when you buy expansion packs.
Proceed in listen that you may need to update and modify the lodge of Timbres afterwards you draw out a path for the Comet, and then think of this as a work in progress.
Now with new Timbres:
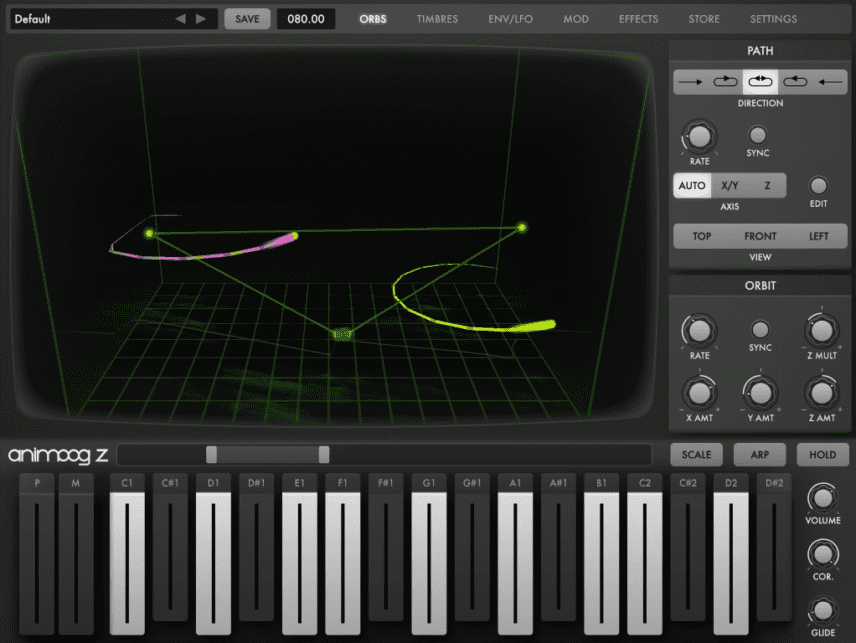
Step 3: Drawing the Comet Path
Adjacent, let's draw a path for our Comets to travel along. Let's go to the Orbs View. We accept a starter path, which is a bones triangle. Nosotros tin can use the Path module on the correct to change this. Clicking on the Edit push reveals Mode buttons Add together, Move and Erase. Press a push button and then click in the Grid to draw points and extend the path. There's likewise a clear button to wipe the whole affair clean.
Using the View buttons, you can see the Grid from unlike angles. Use the Axis buttons to assist click and elevate the whole path, either side to side (X/Y), up and down (Z), or anywhere (Auto).
Nosotros've drawn a downwards-sloping spiral. Here's how it sounds:
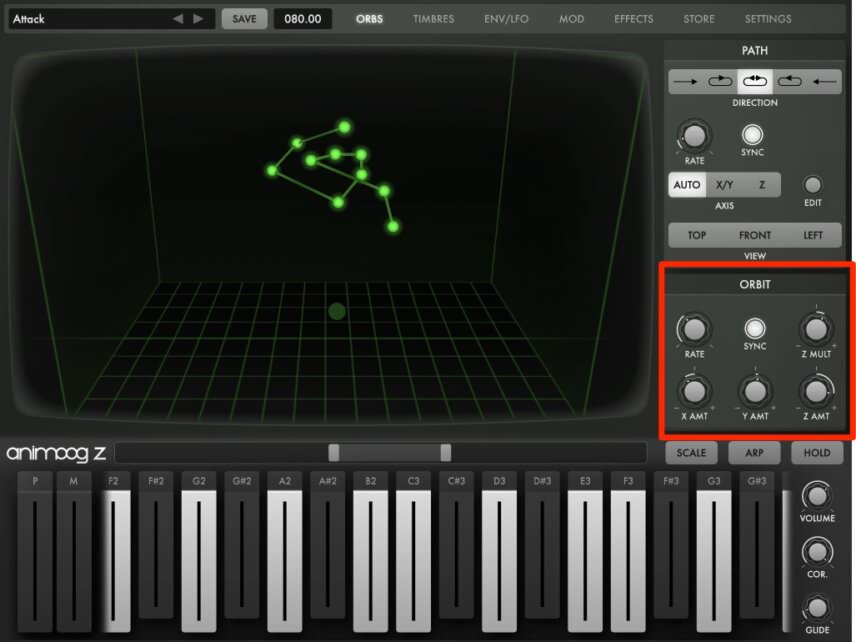
Footstep 4: Fine-Tuning the Path And Orbits
Next, let's fine-tune how the Comet moves through our path. To tie the Comet's move to our DAW tempo, we must click the Sync push in the Path module. We too adjust the rate it moves through the waveforms in a musically pleasing fashion. You can also determine how the Comet moves through its path. Allow'south go with loop.
Next, in the Orbit module, we can play effectually with how the Comet spins around the path. Once more, we sync it to the tempo. We suit the Charge per unit knob plus all the different orbit controls, including the amount (or width) of orbit for each axis. There'due south also the Z Mult knob, which sets the rate of the Z-centrality orbit to exist a multiple of the rate.
Height Tip: Become back and forth, making adjustments to the Comet charge per unit, orbits and Timbres until you become the best results.
It's starting to audio more rhythmically coherent:
Pace 5: Envelopes and Filter
From hither on out, the synthesis parameters are more in line with what you'll find in traditional synthesizers.
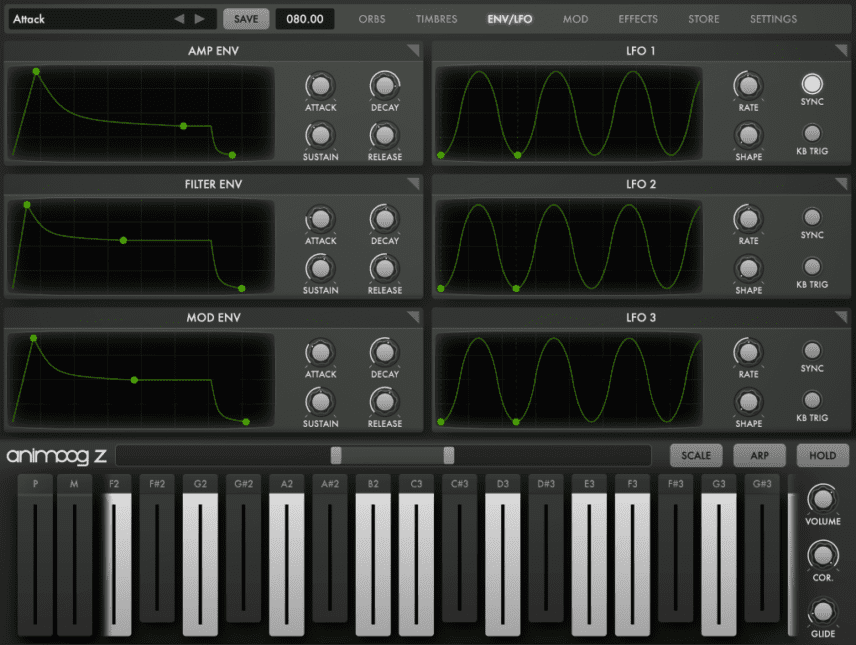
On the Env/LFO page, we can adjust the envelope shapes. Nosotros're making a pad so we want something with a slowish attack. Nosotros give it a long filibuster, medium sustain and medium release.
Side by side, allow'south turn on the filter. Information technology's on the Furnishings View so nosotros jump over in that location, engage it at the bottom, and lower the cutoff (chosen Frequency) a little bit so it'south not and so bright. It could use a footling Resonance besides as some Bulldoze. Finally, nosotros turn the Env knob to the right to give the Filter Envelope control over it. To further shape that, we get back to the Env/LFO view and prepare the envelope, so the filter opens upward naturally with the pad.
Our electric current progress:
Footstep half dozen: LFO and Modulations
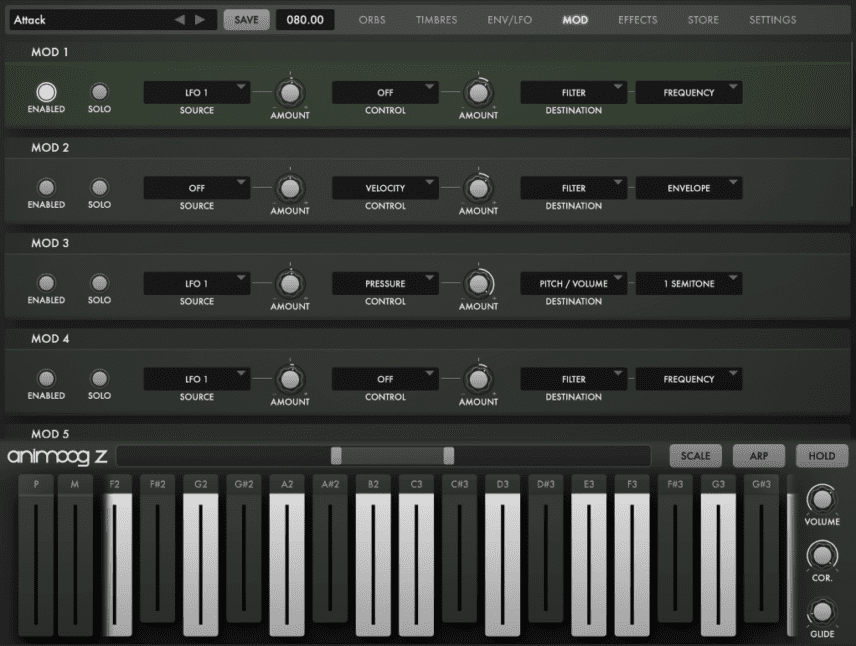
Although in that location's a squeamish corporeality of timbre alter throughout, our pad could use a little more movement. Let's use an LFO to modulate the filter cutoff.
First, we get to our Mod View. Here nosotros enable Mod 1. Nosotros select LFO 1 for the Source and Filter Frequency for the Destination. We use the Corporeality knob side by side to the Source window to dial in how much modulation is sent to the destination.
Next, nosotros need to tweak LFO ane. We get back to the Env/LFO View, click the Sync button under LFO 1, and use the Charge per unit knob to select a nice, medium-slow wave.
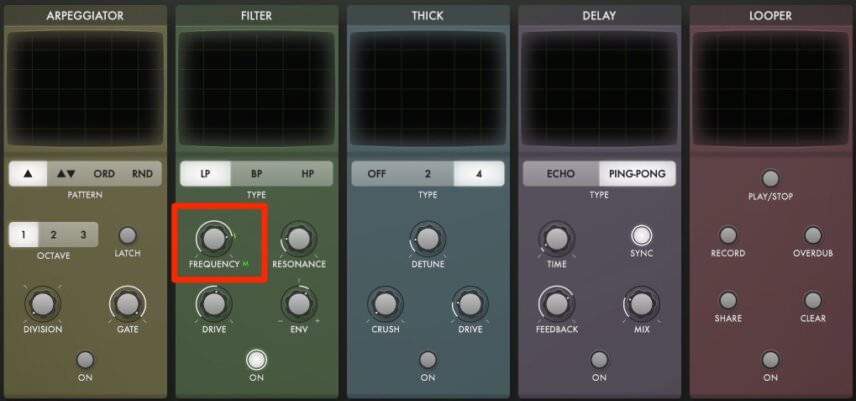
We tin make sure that the filter cutoff is being properly modulated past checking the Filter module on the Effects page. The small green M next to the Frequency knob tells u.s.a. that is indeed existence modulated.
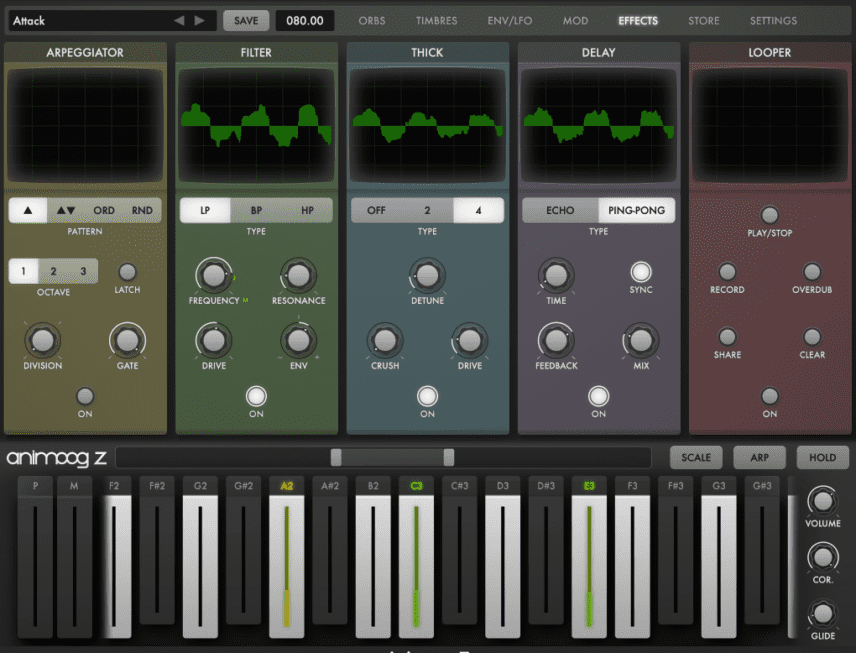
Now with cutoff modulation:

Step 7: Effects
For the final step, we add some effects. Nosotros plow on Thick, a chorus. A picayune Detune and some Drive should practice what we hope it will: thicken upwardly the sound.
We as well engage the Delay issue, using the Ping-Pong setting with low Time and loftier Feedback settings to add together some additional stereo width to our pad.
With furnishings:
Finally, we add some reverb besides as some chill-out loops from the Splice pack, Future Electronic & Arctic.
The finished pad in context:
FOLLOW Assault MAGAZINE
hudsonhabovery1953.blogspot.com
Source: https://www.attackmagazine.com/technique/synth-secrets/programming-an-evolving-pad-with-moog-animoog-z/
0 Response to "Animoog How to Download Expansion Again"
Post a Comment